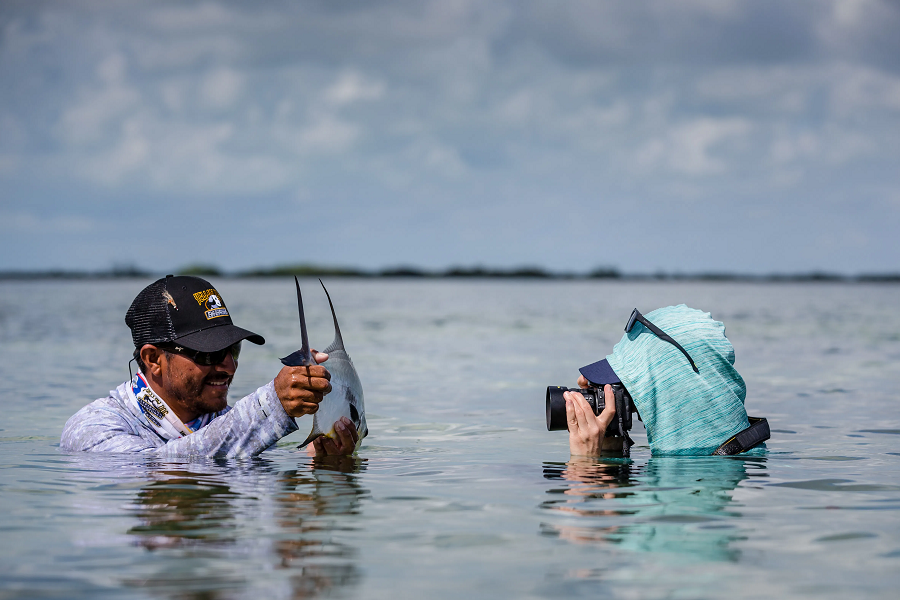
When anglers haul in a big one, they typically want to have their picture taken along with their catch. They do it to show proof that they indeed caught the fish.
Fishing photography, however, isn’t as easy as getting anglers to pose with their catch on camera. Factors, such as weather conditions and lighting, could affect how the final product will look like.
Don’t fret, though. You can take steps to take the best possible photos of an angler’s catch and have these pictures included in your angler’s Alaskan fishing vacation photo album for all to see.
Follow these eight basic photography tips and you’ll be snapping pictures like a pro in no time:
1. Wipe Your Lens
When you’re on a boat, water can easily get into the lens of your camera. You may not notice it until you check the photos.
Before you take awesome shots, make sure you wipe off the condensation forming on your lens. This is applicable not just for photographers using DSLRs, but also for those using a mobile phone or a traditional point-and-shoot camera. This process, which takes less than a minute, will do wonders for the pictures you snap.
2. Get the Person to Hold the Fish Properly
Ideally, anglers should hold the fish horizontally instead of vertically. This way, you obtain a better angle for your photos.
Does this mean that every fisherman should hold the fish horizontally? Not necessarily. Feel free to experiment and figure out which position is perfect. If a vertical shot is more appropriate, have the angler hold the fish by the tail. Then, have them hold the fish’s head and point that toward the camera.
3. Keep the Background Clean
When taking a fishing photo, the two important elements that should stand out are the fish and the angler. Get rid of the clutter that could serve as a distraction to the photograph. A few examples are the fishing net, the bait tank and empty cans of beer.
4. Use Sunlight to Your Advantage
Lighting in photography can spell the difference between a magnificent photo and a “blah” picture. Instead of bringing in bulky lighting equipment for your fish photo shoot, use the sun as your light source. If you take photos in the late afternoon or the early morning, you’ll capture the cloud’s dramatic tones or the beautiful warm light in the photo. On the other hand, taking photos in the middle of the day will make your fish pictures sparkle — perfect if the fish caught has beautiful scales.
5. Experiment with Angles
Tired of taking the overdone and boring “grip and grin” pictures? Change up your shoot by experimenting with angles. Try snapping a photograph from different angles, such as up close, up high, far away or down low. Create interesting depth-of-field effects by asking the angler to hold the fish in a more interesting way. Your shots will look cool when you try out a variety of levels and angles.
6. Consider an In-Water Photo
When you take photos of fish, they don’t necessarily have to be out of the water. You could snap pictures while they’re still in the lake or ocean. If possible, take photos of the fish as they come into the net. You could also take photos of the fish going back into the water if the angler decides to release the animal.
7. Take Pictures of Live Fish
Many fish look colorful and vibrant when they’re still alive. When they’re out of the water for some time, however, they appear dull, dry, and stiff as aboard.
An example of this is the mahi-mahi. When they’re flapping into the boat, they give off this spectacular colors of green, neon blue, and electric yellow. They do, however, turn gray and become lifeless if they are out of the water for too long.
Long story short, take a picture of the fish before it expires. Try to keep the fish alive as much as possible or do an in-water photo. If this isn’t possible, snap that photo as soon as the fisherman lands that haul.
8. (For Action Shots) Put Your Camera on Auto
If the angler is trying their best to land a huge fish, you’ll want to document all the exciting action on camera. Rather than shoot in manual mode, tweak the settings to auto to effectively capture the moment as it unfolds. By configuring the settings to auto, you won’t have to fumble around and look for the best setting.
These eight photography tips will help you take excellent fish photos. Just like angling, practice makes perfect. Make sure you keep on taking shots (and experimenting, as well) to produce photos that will highlight the beauty of a fisherman’s catch.